
I fix plumbing issues often, and wet wood is a common problem. Down here in New Jersey, humid summers and cold winters stress pipe seals. Cheap MDF cabinet floors swell up easily when those pipes weep.
You need a solid fix that lasts. A raised floor under the sink helps manage this issue. It blocks slow drips from soaking your base.
Hard PVC boards handle moisture much better than standard wood. We will look at the right tools and parts for this manageable DIY project. Let us build a smart base to keep your cabinet dry.
What a False Bottom Floor Setup Actually Is
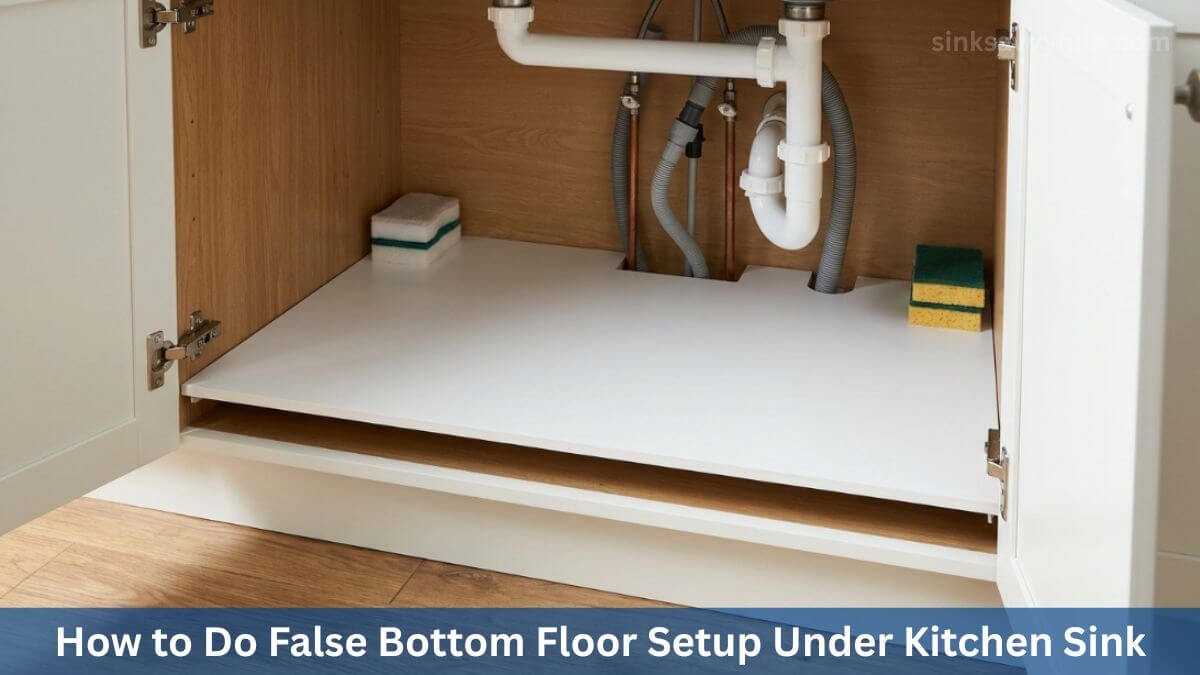
Building a false bottom floor setup under kitchen sink plumbing means adding a raised plastic board. It sits about an inch above your actual wood floor.

Last Tuesday, I noticed a damp smell in my dark cabinet. A tiny pipe drip was soaking silently into the base.
You can handle this by cutting a flat PVC panel. You lift it up with small feet to leave a clear air gap underneath.
That empty space works as a simple warning system. When a pipe drips, the water pools there instead of soaking into the heavy wood.
Why the Under Sink Cabinet Floor Takes More Damage Than Any Other Spot
The floor under your sink takes damage because it sits in a dark, damp area. Water drops fall from cold metal pipes and soak into cheap wood boards.
Last month, the high humidity in my New Jersey home made a small pipe leak worse. Wood acts like a dry sponge in these tight spaces. It drinks up moisture before you even notice a problem.
Factory Wood Rots in Damp Spaces
Most builders use thin MDF or particleboard for cabinet bases. These materials look good dry, but they degrade quickly when wet.
A loose supply hose can drip small drops over many months. The bare wood absorbs that water silently.
You usually spot the swelling when the damage is already done. This turns a simple leak into a much larger repair job.
Plumbing Stops Normal Mats From Working
Thick drain pipes stop flat rubber mats from laying perfectly flat on the base. Water runs down the PVC pipe and slips right under the edges of your mat.
You cannot fit a simple square liner easily around round plumbing parts. The spilled water stays trapped underneath the rubber.
A raised plastic base works around this issue. You cut the hard board to fit comfortably around the metal hoses.
Materials Needed for a Raised Floor Under the Sink
You need a solid board, some small risers, and basic cutting tools to build this setup. It is a very manageable project for a weekend afternoon.

I bought my parts at a local hardware store for under forty dollars. You do not need to hire a professional to build a secure base.
Best Materials for the Raised Platform
Buy a solid PVC board or a rigid plastic shelf. These materials block water well and resist swelling in damp spots. Composite boards work nicely too. They handle heavy soap jugs without bending easily.
Avoid cheap MDF or regular plywood. I used scrap wood once, and it soaked up a small leak and grew mold.
What to Use as Risers
You need small legs to lift your flat board off the bare wood floor. Short pieces of scrap PVC pipe or thick rubber furniture feet work well.
Aim for a one-inch air gap underneath the main board. This leaves enough room for air to flow and catch drips.
Place these feet close together across the whole base. Spacing them evenly stops the plastic from bowing when you press it.
Tools Required
Grab a dark pencil and a metal tape measure from your desk. You need these to mark the exact pipe spots on your new board.
Use a simple jigsaw to cut the round holes for your drain hoses. Keep some rough sandpaper nearby to smooth out the cut edges. A tube of waterproof glue keeps the rubber feet locked down so the base stays steady.
How to Install a Raised Floor Under Sink Cabinet Step by Step
Going slow during your install creates a flat platform that lasts without shifting. Rushing this DIY project can lead to crooked boards and wasted plastic.
Last Sunday, I rushed a cut in my garage and missed the pipe mark by two inches. Taking your time saves material and stops a lot of frustration.

Step 1: Measure and Map the Cabinet Floor
Pull every wet sponge and heavy soap jug out onto your kitchen floor first. Measure the clear interior depth and width of the bare base with a metal tape.
Grab a pencil and draw lines on the wood where your drain lines drop down. You must know exactly where these metal pipes hit the floor.
I usually take a quick photo on my phone. This helps me remember the layout when I walk outside to cut.
Step 2: Cut the Platform to Fit
Transfer your numbers to the hard board and cut the outer square shape first. Once the main shape fits, use your jigsaw to cut out the round pipe holes.
Make the pipe holes a little bit oversized. A tight fit around a pipe makes the heavy board hard to slide into place.
Rub rough sandpaper on the fresh cuts. Smooth edges stop the board from snagging the wood cabinet frame.
Step 3: Position the Risers and Set the Platform
Space your short rubber feet evenly across the bare wood base. Set your cut plastic sheet right on top of these small legs.
Push down on the middle and the deep corners with your hands. The flat board should feel solid without moving much.
If the plastic bends when you press it, pull it up. Glue one more rubber foot right under that weak spot.
Step 4: Add a Waterproof Under Sink Cabinet Liner
Lay a flat waterproof under sink cabinet liner over the top of your new board. This extra rubber mat catches sticky soap spills and wet drips.
You can wipe messy spills off the smooth rubber easily. It helps keep your hard false bottom in good shape over time.
Grab some scissors and trim the mat edges. Make sure it lays flat and wraps neatly around your drain hoses.
How a False Bottom Helps Protect Under Sink Cabinets From Leaks
A raised board catches slow drips in an open gap so you see the water early. This setup acts as a practical alarm for hidden leaks.
Last Thursday morning, I opened the cabinet door to grab a dry sponge and heard a faint splash. A loose supply line was weeping cold water.
Because I built a false bottom floor setup under kitchen sink pipes, the drip formed a clear puddle underneath. The cabinet wood stayed completely dry.
If you just drop a flat rubber mat down there, spilled water traps itself in the dark. A raised plastic floor keeps the moisture visible in the light so you can clean it up fast.
When to Combine This Setup With an Under Sink Cabinet Base Repair
You should fix a rotting wood base before covering it up. Building a raised platform over wet wood just hides a growing mold issue.
Last Friday, I checked a damp sink floor and the wood felt spongy. You must address the rot before putting a new board over it.
Signs the Existing Floor Needs Attention First
Check your bare wood for dark stains or swollen edges near the back wall. If the wood feels soft when pressed or smells musty, you likely have active rot. You need an under sink cabinet base repair before moving forward with your new base.
Simple Repair Before You Build
You can fix minor surface stains with a coat of waterproof wood sealant. This seals the dry wood tight and stops light moisture.
If the board is very soft, pull it out. Drop a cut-to-fit piece of rigid PVC board in its place. Once you fix that damaged base, set your new raised platform on top.
What to Store on the False Bottom Once It Is In
A leak-catching floor under the sink gives you a clean space to safely store gear. Last Sunday, I put my bright yellow sponges back into my organized cabinet. You finally have a steady base you can rely on for your supplies.

- Drop small plastic bins in the front for your daily dish soaps.
- Push tall glass bottles to the back wall so they stay balanced.
- Set a round spinning tray in the deep corner for extra trash bags.
- Leave the bare space right around your cut pipe holes completely empty.
Keeping that pipe gap clear lets you spot fresh water drips easily. You grab exactly what you need, and your wood base stays safe.
Frequently Asked Questions
What is the best board for a raised sink cabinet floor?
You want a hard plastic or thick PVC board. These strong parts resist rot in damp spots. They block slow leaks well. Avoid using standard wood to build this base.
How high should a false bottom floor setup under kitchen sink sit?
Lift the flat board about one inch off the bare wood base. This clear gap gives early drips room to pool. You see the wet spot early and protect your wood floor.
Do I need an under sink cabinet base repair first?
Yes, you should fix wet and soft wood before you drop the new board in. A fresh false bottom over bad rot hides mold. Fix the old base to keep your cabinet clean.
Does this trick protect under sink cabinet areas from leaks well?
It works nicely as a simple drip alarm. Small drops fall into the open air gap so you spot them. You catch the slow leak before it causes major damage to your wood base.
Should I add a waterproof under sink cabinet liner too?
Yes, lay a flat rubber mat directly on top of the hard plastic board. It catches sticky soap spills easily. You can wipe it clean quickly to keep your storage area fresh.
A Small Build With a Long Term Payoff
A false bottom floor setup takes a few hours of careful work. It helps save you from dealing with major water damage later.
Last week in my New Jersey home, I opened my dry cabinet doors. I smelled clean plastic instead of damp, rotting wood.
You build this raised floor once to manage slow leaks and keep your base dry. Try this practical project this weekend and improve your dark plumbing space.
